A question I see a lot among new photographers on various Facebook groups is “what is raw?” or “why should I use raw?”. As I hate anything vague I’d like to explain the differences between RAW and JPEG formats in some detail.
Essentially, the short version is this: a raw file is generally a completely lossless file. You get exactly what the camera captures. A JPEG is highly compressed and throws away a lot of information.
Here’s the longer, more detailed version:
Your Image Sensor
Consider the image sensor. Your camera has an array of light-sensitive photodiodes, one or, in a few cameras, two or three per pixel. The photodiode is sensitive to a broad spectrum of light, and so in it’s native form, it’s a monochrome light detector.
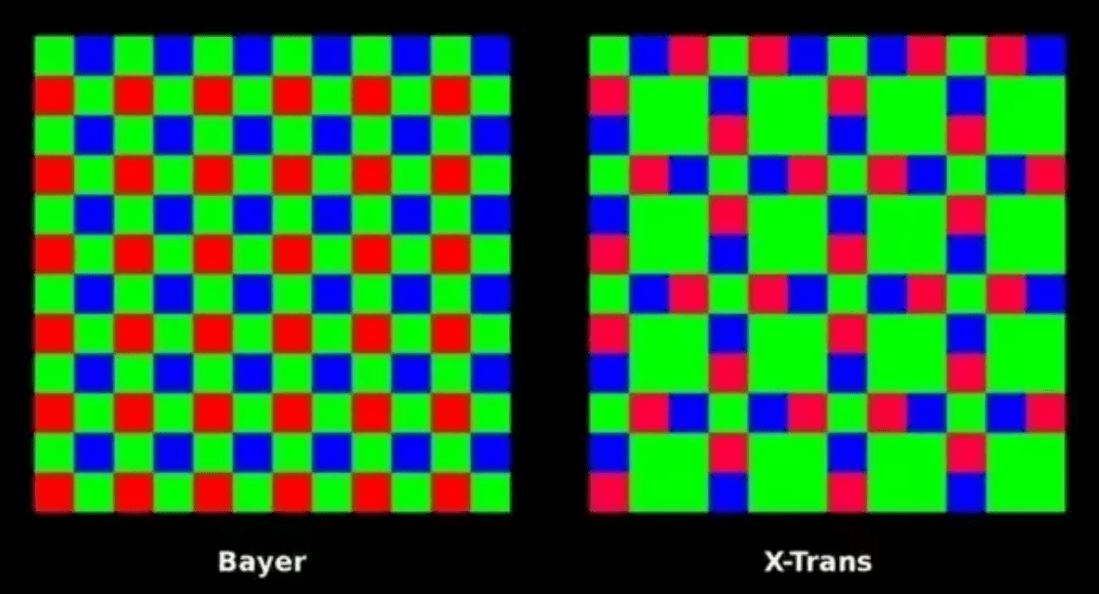
Cameras make these into colour sensitive sensors, in most cameras, by adding colour filters. Most cameras use a Bayer filter array, named after Bryce Bayer, who invented this pattern at Kodak. There have been other patterns over the years, such the X-Trans pattern shown here, used on some Fujifilm cameras.
When you shoot a raw photo, the digitised output of each sensor is stored directly in the raw file, at the full resolution of the sensor’s analog-to-digital converter in most cases (some cameras offer various somewhat compressed raw modes, designed either to increase camera shooting speed or decrease the needed storage).
How We Get Full Color
So the raw image is only one colour per pixel… how do we get to RGB? That’s a process called demosaicing.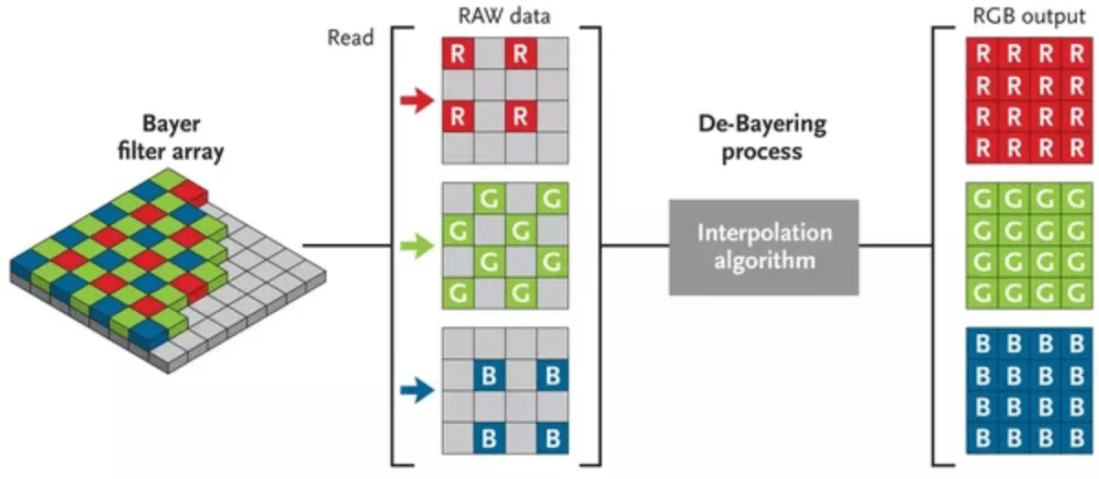
If you look at the Bayer sensor, every red pixel is surrounded by four green and four blue, every green pixel is surrounded by two red and two blue, and every blue pixel is surrounded by four green and four red pixels. The missing colours per pixel are interpolated from the surroundings. It’s reasonable to assume that the missing green value for a red pixel would be the average of its green neighbours; the missing blue value interpolated from an average of its blue neighbours. Most complicated patterns may use more sophisticated algorithms, but that’s the basic idea.
When you shoot raw, this process is not done in-camera, but on your editing computer. And yeah, you need the editing computer. A raw image is often called a digital negative — in fact, Adobe’s “universal” raw format is called DNG, which stands for Digital NeGative. You never alter a raw file, you either do non-destructive edits on it, or you clone it to a different format to make big changes.
And so, for the raw image, we’re done. It’s put in a file, either a DNG file or some manufacturer’s proprietary format (Nikon has NEF, Canon has .CR2, Sony has .ARW), and saved to memory. Many raw files use the TIFF file format as their basis, but they are not read by TIFF readers, but specific plug-ins used for raw file processing. After all, that plug-in has to contain the information about your camera’s specific sensor, or, if you’re making a DNG file, the function that converts your camera’s sensor format to DNG encapsulates all necessary special information about that sensor.
The Long Journey of JPEG
The other common option for digital photography these days is JPEG. JPEG was invented by an industry group called the Joint Photographic Experts Group to deliver a format that could be highly compressed, with information tossed out, but ideally, not much information most people would care about. It’s essentially the same idea for photos as MP3 and others are for music.
So JPEG starts off where the raw image was left, and applies the demosaicing interpolation to deliver a full RGB image. Then it proceeds to eliminate information.
The first thing it does is downsample your colour information. Most professional cameras have enough sensor and ADC resolution to sample 12 or 14-bits per colour. The JPEG algorithm used in pretty much every camera downscales this to 8-bits per colour.
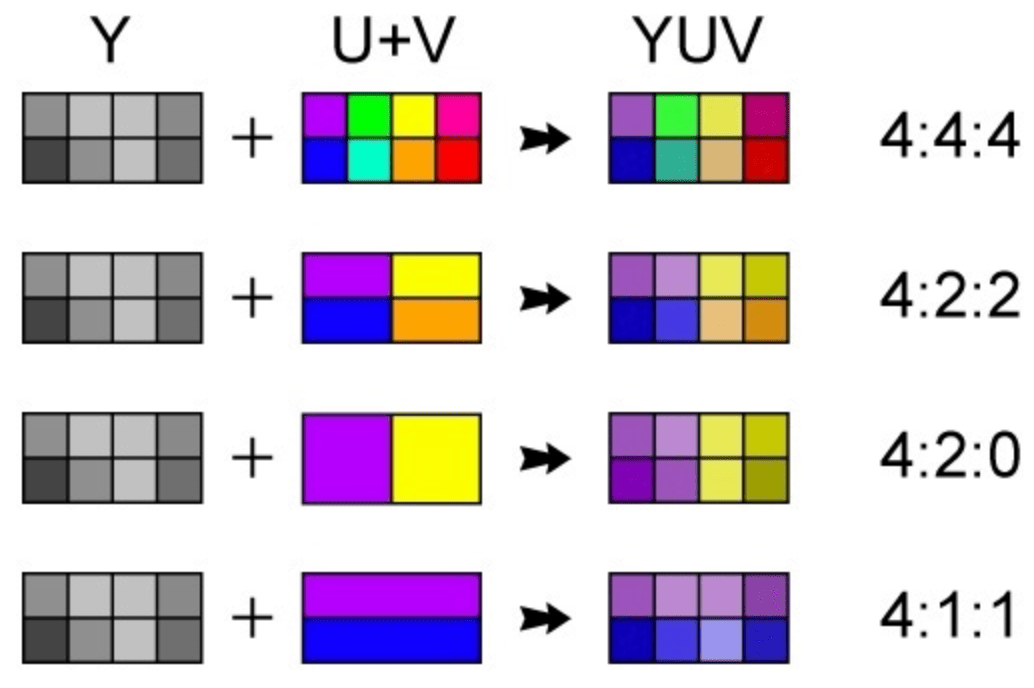
That colour is usually then converted to the YCbCr colour space, which stores luminance (Y) separate from two chrominance values (Cb, Cr). Why? The RGB colour space is pretty easy to create with electronics, like your sensor or a television screen. But the YCbCr colour space separates the luminance, which your eyes are really sensitive to, from the chrominance, which, well, not so much. Your eyes have 120 million luminance-sensitive photo receptors but only about 6 million colour receptors (see more at the end).
The next terrible thing we might do with our JPEG is colour subsampling. If we don’t actually subsample (eg, toss out colour), we have what in the photo/video image processing YCbCr world is called 4:4:4 subsampling, or 1×1 subsampling, despite there being no subsampling. If we toss out every other colour sample, which is sometimes done in JPEG compression, we get 4:2:2 compression. If we toss out 3/4 of the color samples, depending on the pattern, we get 4:2:0 or 4:1:1 subsampling — pretty much all consumer video is 4:2:0, while the NTSC DV format is 4:1:1.
Next, we divide up each photo into 8×8 blocks of pixels. And we run a mathematical transform on each, called the Discrete Cosine Transform, which is related to the Fourier Transform. These 8×8 blocks of spatial information become 8×8 blocks of frequency information. And other than some loss of precision through the mathematics, this transform is fundamentally reversible.
The next one is where the big lossy compression part takes place: quantisation. This is basically going to toss our higher frequency information in each 8×8 cell. That higher frequency information, sharper details, etc. is not all that noticeable when the image is re-converted, particularly as it’s done a little differently, block to block, based on the contents of each cell.
All that zeroing out of the higher frequency information then makes the whole thing easier to compress using entropy encoding. What’s is that, exactly? It’s lossless compression, the same idea as dropping things into a ZIP file.
JPEG is Damaged Goods
Once the JPEG is out of the camera, it has tossed out 33%, maybe 43% of the colour information. While to many people this looks completely fine, it’s an incredibly fragile file. Load up your JPEG into Lightroom, and it’ll expand on screen to it’s full 8-bit compromised glory. What if you want to increase or decrease the image by one EV (exposure value). You can! But now you have 7-bits per colour. And if you’re doing repetitive edits, you can destroy the image really quickly.
Let’s contrast that to a raw file. For one, you’re never actually editing a raw file directly, as you might (but don’t have to) with a JPEG. So you boost your 14-bit DSLR shot by 1 EV, you now have a result at 13 bit… still better than the 8 or maybe 10-bit resolution of your monitor. There’s room for making adjustments. Of course there isn’t infinite room, but much, much more than you have with JPEG.
It’s not just that, either. A final target image, whether a JPEG or PNG for the web or a print, is not going to need that 14-bits of colour. But you get to decide just how you want to render that digital negative into a deliver format. You might compress the dynamic range, you might want to selective apply colour curves, change colours, convert to black and white, etc. It’s all just going to work better with raw images.
The Professional’s Raw Workflow
Given that you can’t get a better image out of your camera than a raw file, it should not be a surprise that professionals tend to shoot in raw. Not always, of course… a JPEG will deliver a straight-out-of-camera shot that’s ready to go somewhere… 800 million Instagram users can’t be wrong, right?
Over time tools have evolved to do raw processing. When you shoot JPEG, the camera does the demosaicing, but on your PC, you use a raw photo management tool for that. I started out using Lightroom a few years ago as I delved deeper into photography. Lightroom, over the years, evolved in to a tool that does three things. It manages large collections of digital images, enabling tagging and database searches. It includes a wide range of tools for manipulating images, all of which apply to raw images, thus, the manipulations are non-destructive: you always have your original image. The changes made are essentially a list of changes managed by Lightroom — so if you back out of a change, unlike in destructive editing, there’s no potential loss of resolution. And most recently, Lightroom offers a means of making edits to your raw files — again, non-destructively. There are of course other programs that do this sort of management as well, but I (and thousands of other photographers) have found Lightroom to be the best.
This certainly could be done with JPEG, but it was the permanence of raw that lead program designers to non-destructive editing and in that regard, there’s really no difference between raw and JPEG in these applications, other than the higher image quality of raw. You’ll be faced by much more constraints editing JPEGs that simply don’t exist with raw images.
tldr; shoot raw.
